Open your current Figma file. Scroll through the layers panel on the left.
How many layers are called Rectangle 47? How many say Group 3, Frame 1, Ellipse 12?
If the answer is “most of them” — you have the most common beginner habit in Figma. And fixing it is the single fastest way to make your work look and feel more professional.
The habit is simple: name every layer.
Why layer names matter more than you think
When most beginners hear “name your layers,” they think it’s a housekeeping tip. Something you do if you have spare time, or if you’re feeling tidy.
It’s not. It’s a fundamental workflow decision that affects how fast you work, how well you collaborate, and how your portfolio actually reads to other designers.
Here’s what unnamed layers cost you:
Time. Every time you need to find a specific element, you’re hunting through a list of Rectangle 47 and Group 3 entries, clicking each one to see what it selects on the canvas. In a file with 50 screens, this adds up to hours.
Collaboration. If you hand a file to a developer or another designer, unnamed layers are a nightmare to navigate. A developer looking for the navigation bar doesn’t want to click through 12 groups called Frame to find it.
Your own memory. Come back to a project after two weeks. Unnamed layers make your own file feel like someone else’s mess.
Your portfolio. When you share Figma files in your portfolio, other designers and hiring managers open them. They look at the layers panel. A clean, named structure signals that you think like a senior designer — someone who builds files for others, not just for themselves in the moment.
What a beginner’s file looks like vs. a senior’s
Here’s the same screen, two different layer structures:
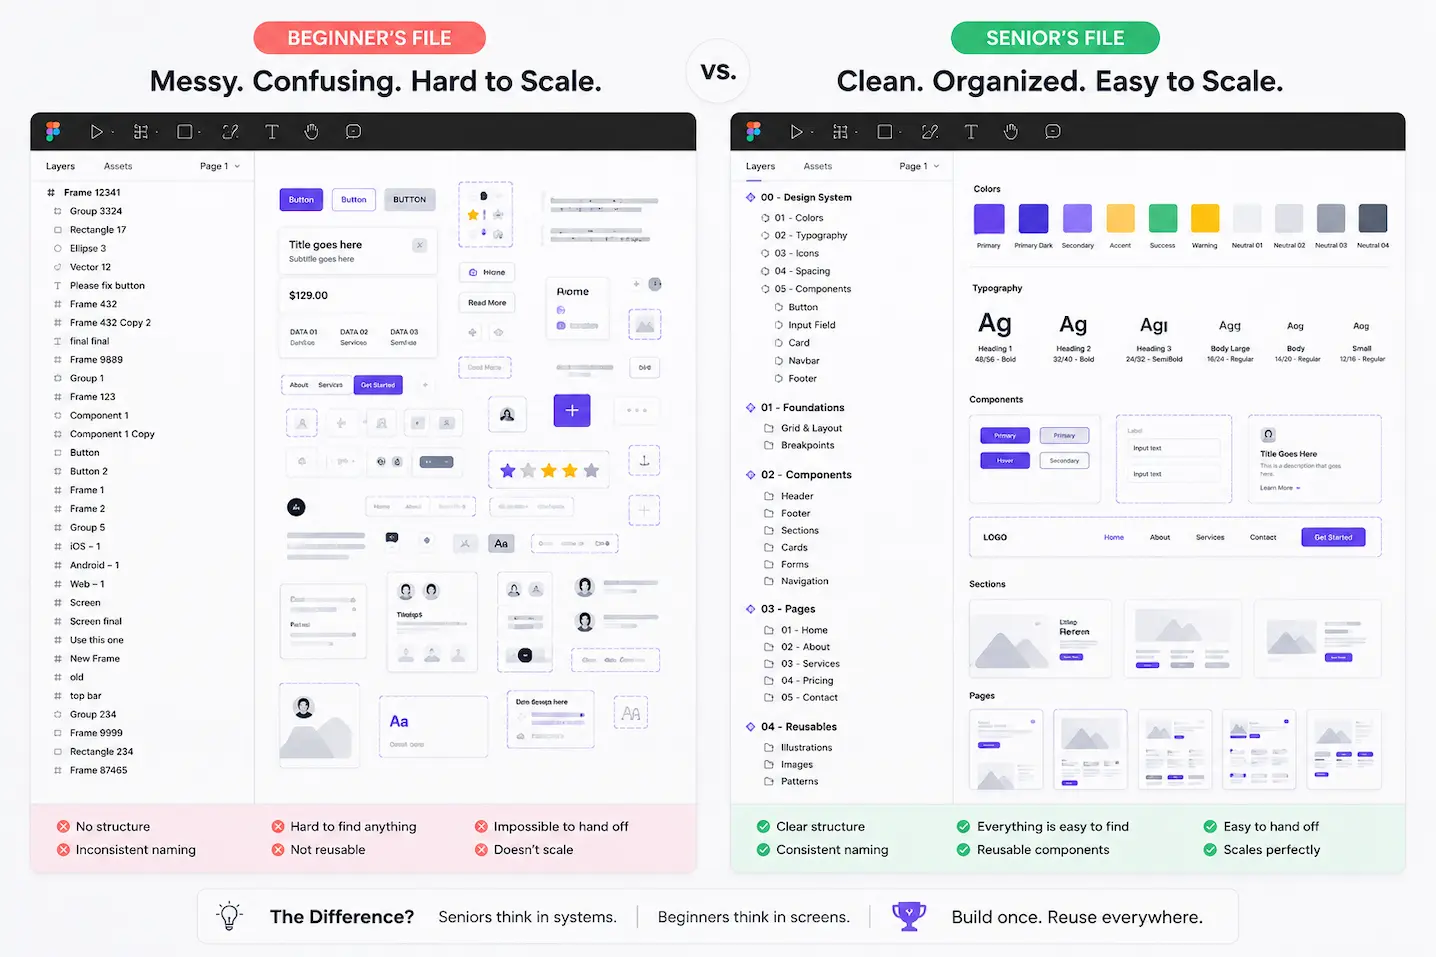
Beginner:
Frame 1
  Group 3
    Rectangle 47
    Ellipse 12
    Text 8
  Group 7
    Rectangle 51
    Text 14
Senior:
hero-section
  user-card
    user-avatar
    user-name
    user-role
  cta-button
Same design. Same pixels on screen. Completely different experience to work in — and to review.
The senior version tells you exactly what everything is without having to click anything. You can search for cta-button and find it instantly. A developer can scan the structure and understand the component hierarchy before writing a single line of code.
A naming system that actually works
The best layer naming is consistent and readable. Here’s the system that works across any project:
Use lowercase with hyphens
user-avatar not UserAvatar or user avatar or useravatar. Lowercase with hyphens is easy to read, easy to search, and matches the naming convention developers already use in CSS — which makes handoff smoother.
Name by purpose, not appearance
primary-button not blue-button. hero-image not large-rectangle. Names based on appearance break the moment a color or size changes. Names based on purpose stay accurate forever.
Name by content for text layers
nav-label or even Home for a nav item is better than Text 14. For any text layer that holds real copy, the text content itself is usually the best name.
Group with intention
Groups and frames should describe what they contain as a unit. nav-bar, pricing-card, footer-links. Not Group 3.
Be specific at the leaf level
The outermost frame can be sign-in-screen. Its children get specific: sign-in-form, social-login-row, sign-in-header. Children of those get more specific still. The structure should read like an outline of the design.
The 3-second rule
Every time you create a new layer in Figma, name it before you move on. This takes about 3 seconds — double-click the layer name in the panel, type the name, press Enter.
3 seconds per layer.
That feels like nothing. But over a full project with 200 layers, that’s 10 minutes of intentional naming vs. potentially hours of confusion when editing, sharing, or returning to the file later.
The cost of naming is tiny. The cost of not naming compounds over time.
How to clean up a file that’s already a mess
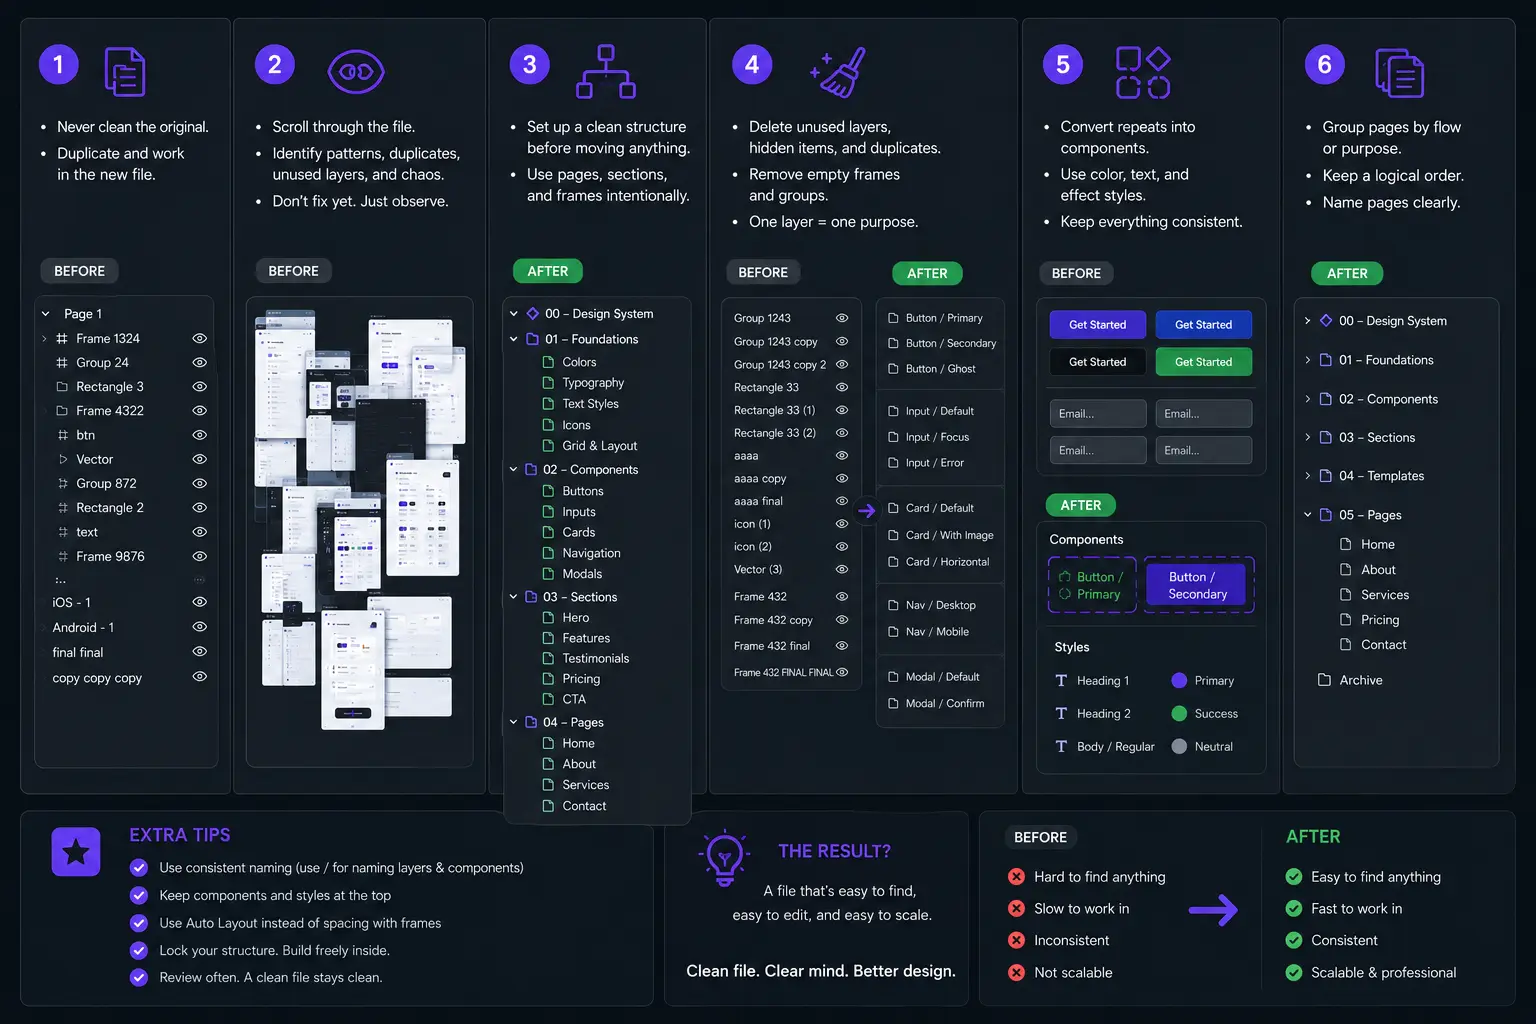
If you have an existing file full of unnamed layers, here’s how to tackle it without losing your mind:
Work screen by screen, not layer by layer. Open one frame, name everything inside it, then move to the next. Breaking it into frames makes it manageable.
Use Figma’s search (Ctrl/Cmd + F) to find all layers with the same auto-name — like Rectangle — and rename them in one session.
Prioritize the components. If you have a design system page (which you should, after Day 20), name those layers first. Those components get reused everywhere, so clean names there have the highest leverage.
Don’t aim for perfection on the first pass. Even getting from Rectangle 47 to card-background is a massive improvement. You can always refine further as you work.
What this looks like on a real project
Here’s a naming structure for a simple sign-in screen:
sign-in-screen
  header
    logo
    back-button
  sign-in-form
    form-title
    email-field
      email-label
      email-input
    password-field
      password-label
      password-input
      show-password-toggle
    submit-button
  divider-row
    divider-line-left
    or-label
    divider-line-right
  social-login-row
    google-button
    apple-button
  sign-up-prompt
    prompt-text
    sign-up-link
Anyone — another designer, a developer, you in three weeks — can open this file and know exactly what they’re looking at. No guessing. No clicking through unnamed groups to find the submit button.
That’s the goal.
The portfolio angle
When you share work in your portfolio, most designers include a Figma link. Senior designers and hiring managers who review portfolios will often open that file and look at the layers panel.
A file with clean, intentional layer naming shows that you think about your work holistically — not just how it looks on screen, but how it functions as a deliverable that other people will use. That’s a senior mindset. It signals craftsmanship.
And it costs you almost nothing to develop the habit.
The takeaway
Naming your layers isn’t a nice-to-have. It’s the difference between a file that looks like a portfolio piece and one that looks like a draft.
Start with your next new layer. Double-click. Type something that describes what it is. Press Enter.
Do that consistently, and your files — and your portfolio — will start looking like they were built by someone who’s been doing this for years.
Published by ZywraStudio · zywra.com Follow on Instagram for daily Figma tips: #Zywra_official